Categorizing your gradebook is one of the most effective and straightforward strategies for maintaining an organized, efficient course structure. By grouping related assignments into categories, you lay a structured foundation that simplifies grade management throughout the semester. This organization makes advanced grading rules easier, allowing you to automatically drop a student's lowest-scoring assignment or calculate weighted averages across specific item types.
Whenever you create a new assessment or assignment, Blackboard automatically generates a corresponding column in the gradebook and assigns it a default category based on the tool used. However, you can easily create custom categories based on your needs and reorganize your gradebook at any time.
Create a New Category
To create a new category:
- Select the Settings (or the Cog icon) in your gradebook
- In the gradebook settings panel, scroll until you see "Add a New Category."
- Enter the name for the category and hit "Enter" on your keyboard.
Reorganizing Your Current Category
Blackboard makes it easy to reorganize your current categories! To do so:
- Select the Settings (or the Cog icon) in your gradebook
- In the gradebook settings panel, scroll until you see "Item Management" and click "Manage Gradebook Items."
- Select your desired materials by clicking on the squares on the left hand side
- Once you have selected your materials, click "Edit Category" in your top right hand corner.
- A menu will pop up and you can now change the items you have selected to a new category.
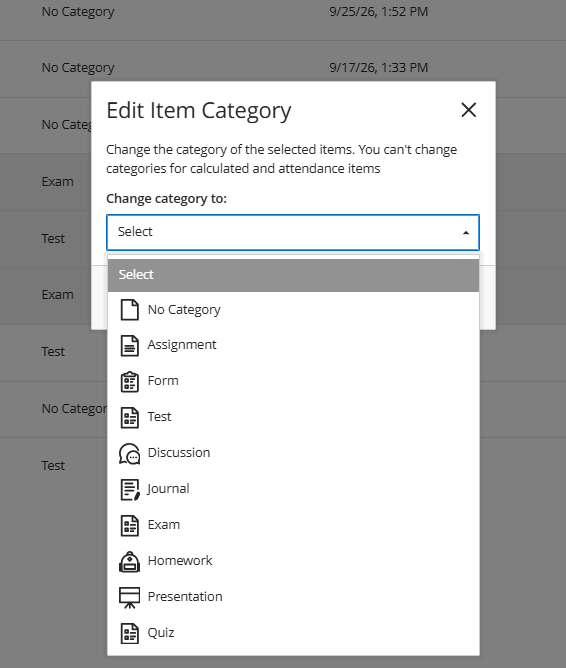
- Click Apply.
You can learn more by visiting Blackboard's support article on Grade Categories.
Was this article helpful?
That’s Great!
Thank you for your feedback
Sorry! We couldn't be helpful
Thank you for your feedback
Feedback sent
We appreciate your effort and will try to fix the article